WAFFLE LAB:
Whipped Cream and Syrup Station
Quick Summary:
27 students split into 5 subgroups, each owning a different part of the pipeline: pouring batter, dispensing toppings, slicing strawberries, driving the robot between stations, and keeping all the Raspberry Pis talking to each other
The class had full control over how we organized and set our own deadlines
I helped lead the whipped cream station, and designed a rack-and-pinion system to press the nozzle, and modeled the whole setup for prototyping
I also pitched to the professor and my peers adding maple syrup to the project, which wasn’t in the original scope because of mess concerns, and constructed a system with multiple redundant measures taken to ensure a clean, consistent syrup dosage
Skills used: 3D modeling, rapid prototyping, electronics, Raspberry Pi, cross-team collaboration, and breaking a big problem into smaller ones

Top Down view of Challange
Task at hand
Built a fully autonomous system to make waffles from scratch, with a Create 3 robot ferrying a plate between stations
The waffle station sprayed the iron with nonstick spray, poured in the batter, then flipped the entire maker over to drop the finished waffle onto the plate
The strawberry station lined up strawberries, used machine learning to identify the stem, cut it off with a rack-and-pinion knife, then sliced the berry
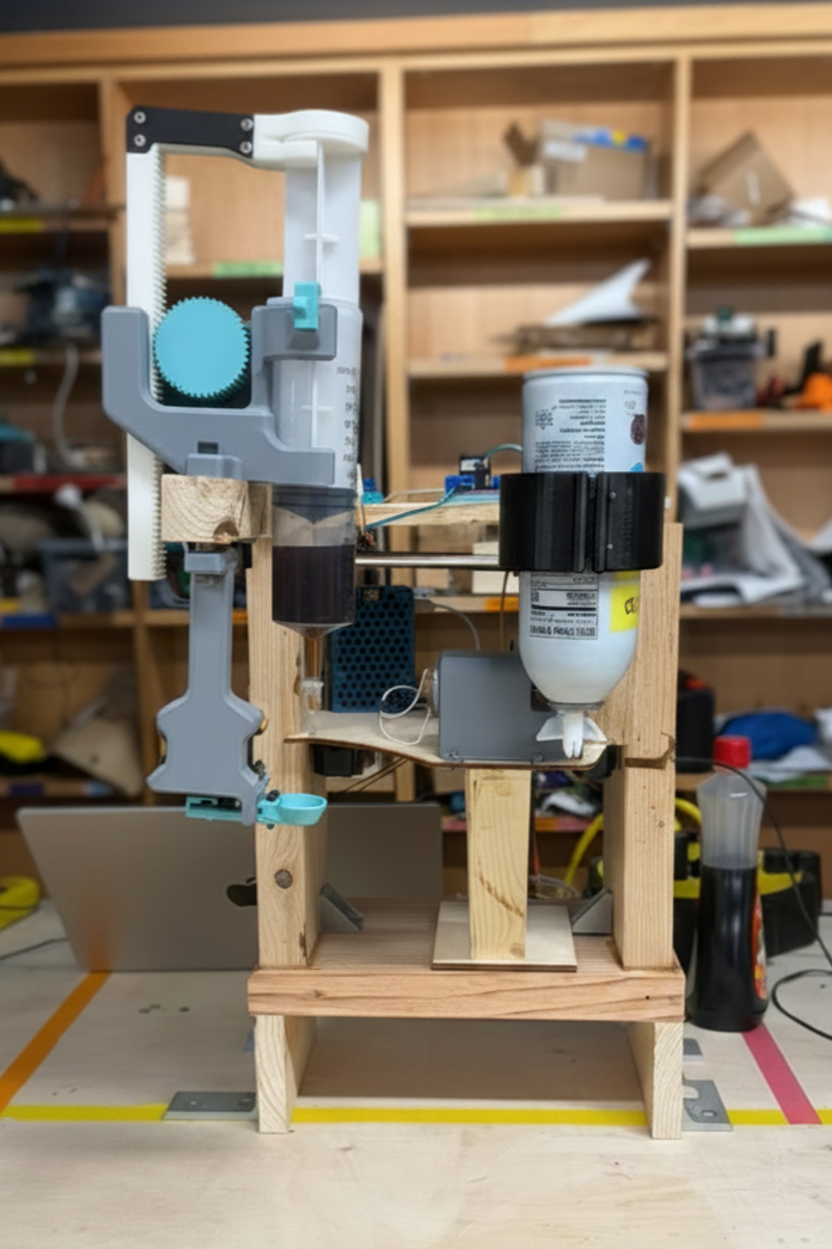
Parts I contributed to directly
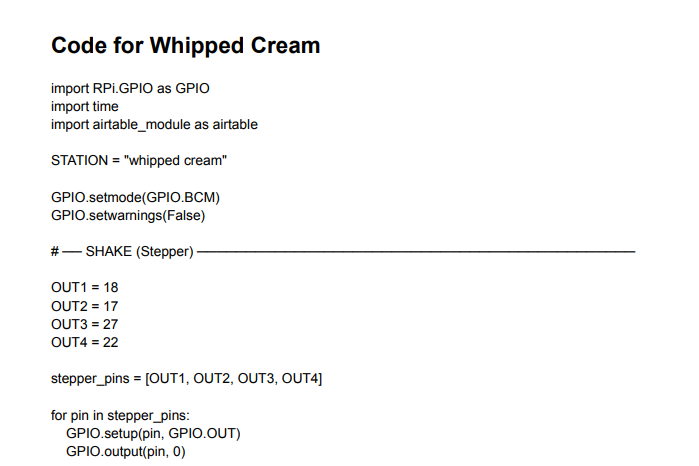
Whipped cream station had to shake the canister and press the nozzle to spray evenly onto the waffle
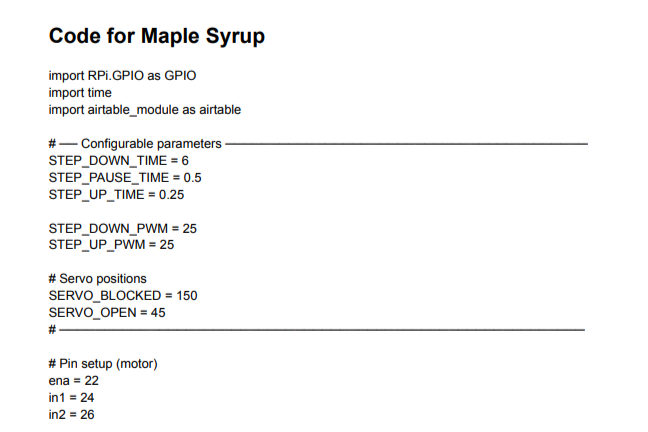
Maple syrup station had to dispense a consistent stream of syrup with no dripping once the pour was done
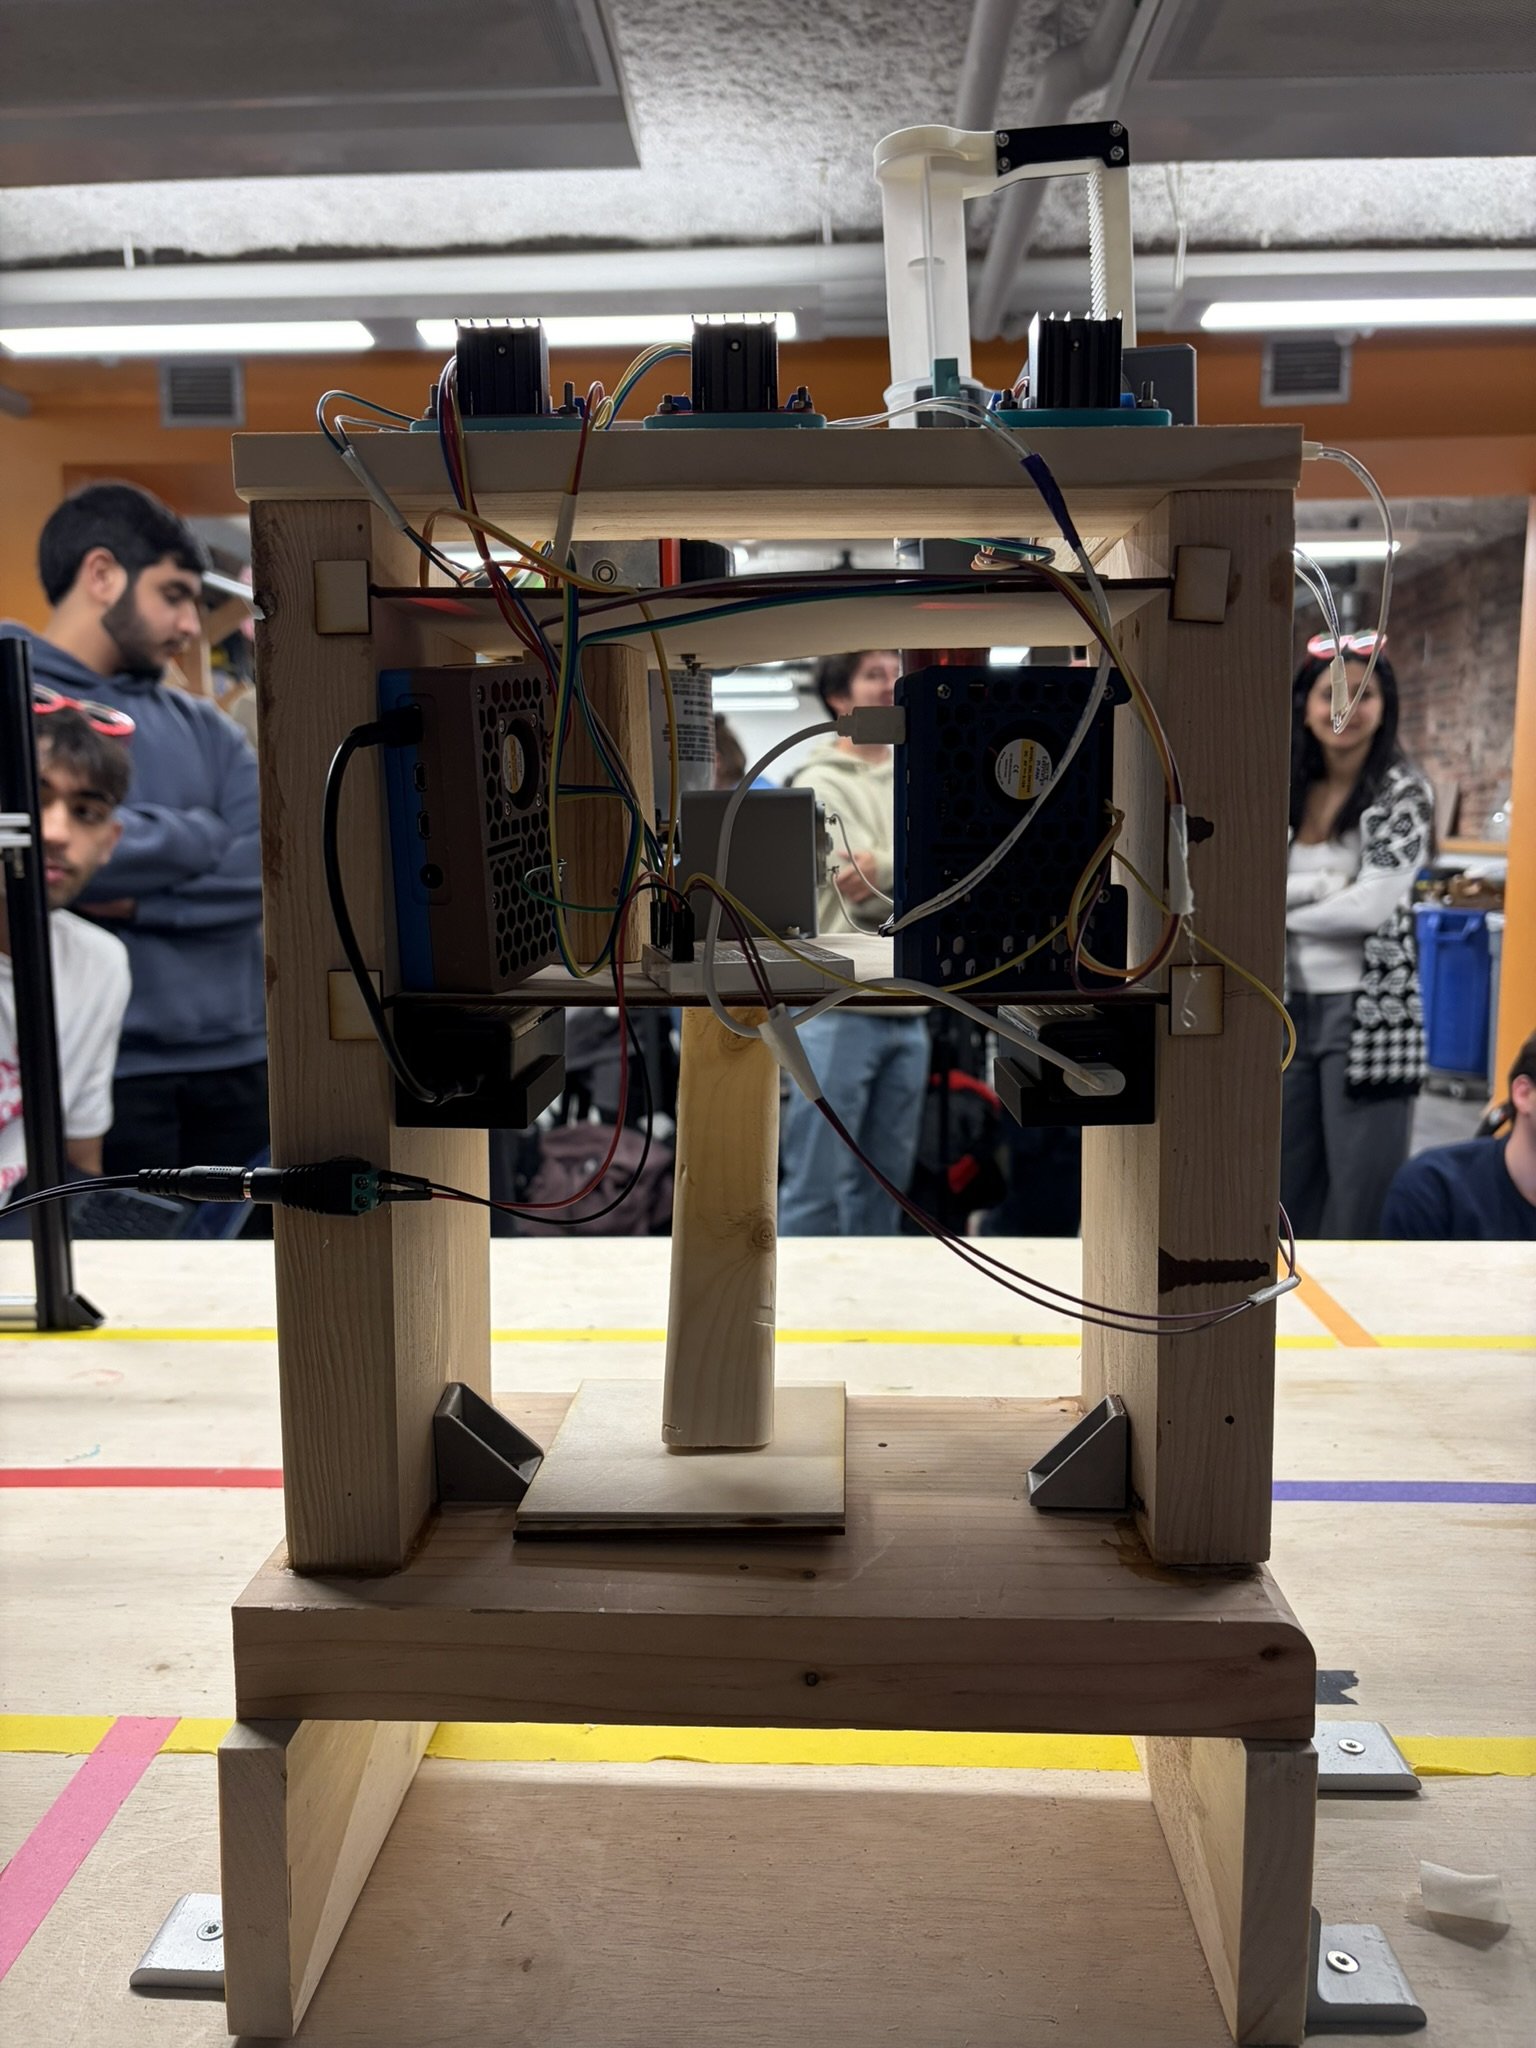
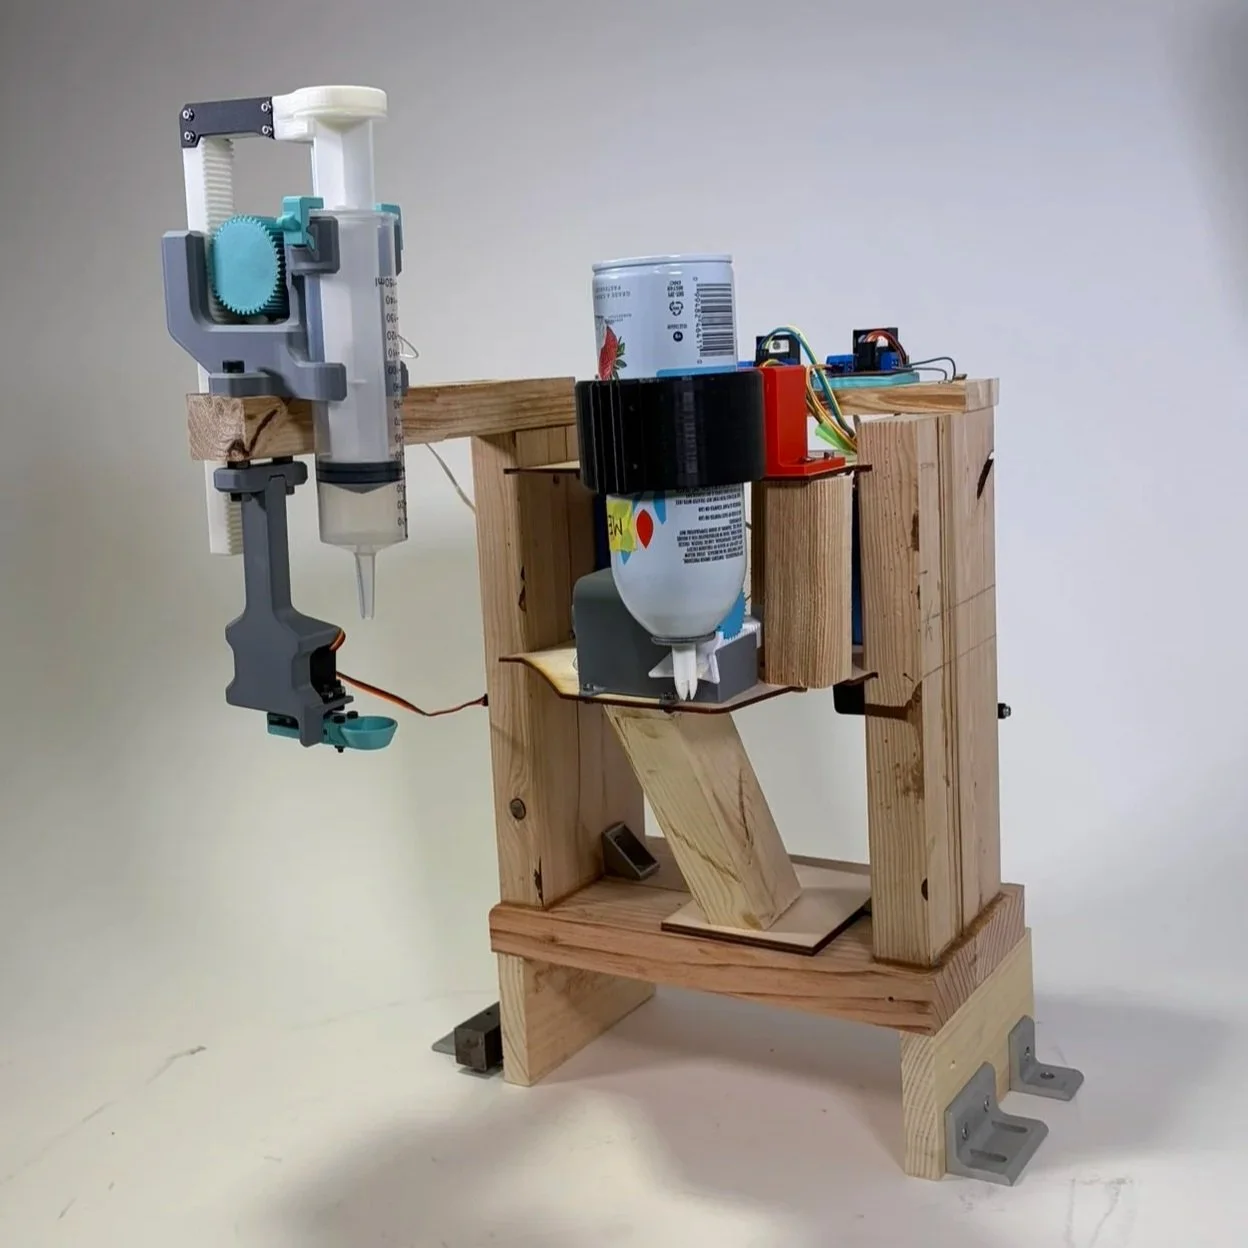
Topping Station
Wooden stand
Fully modular design with interchangeable laser-cut birch platforms
Additional wooden pieces added to brace components and limit movement on the flexible platforms
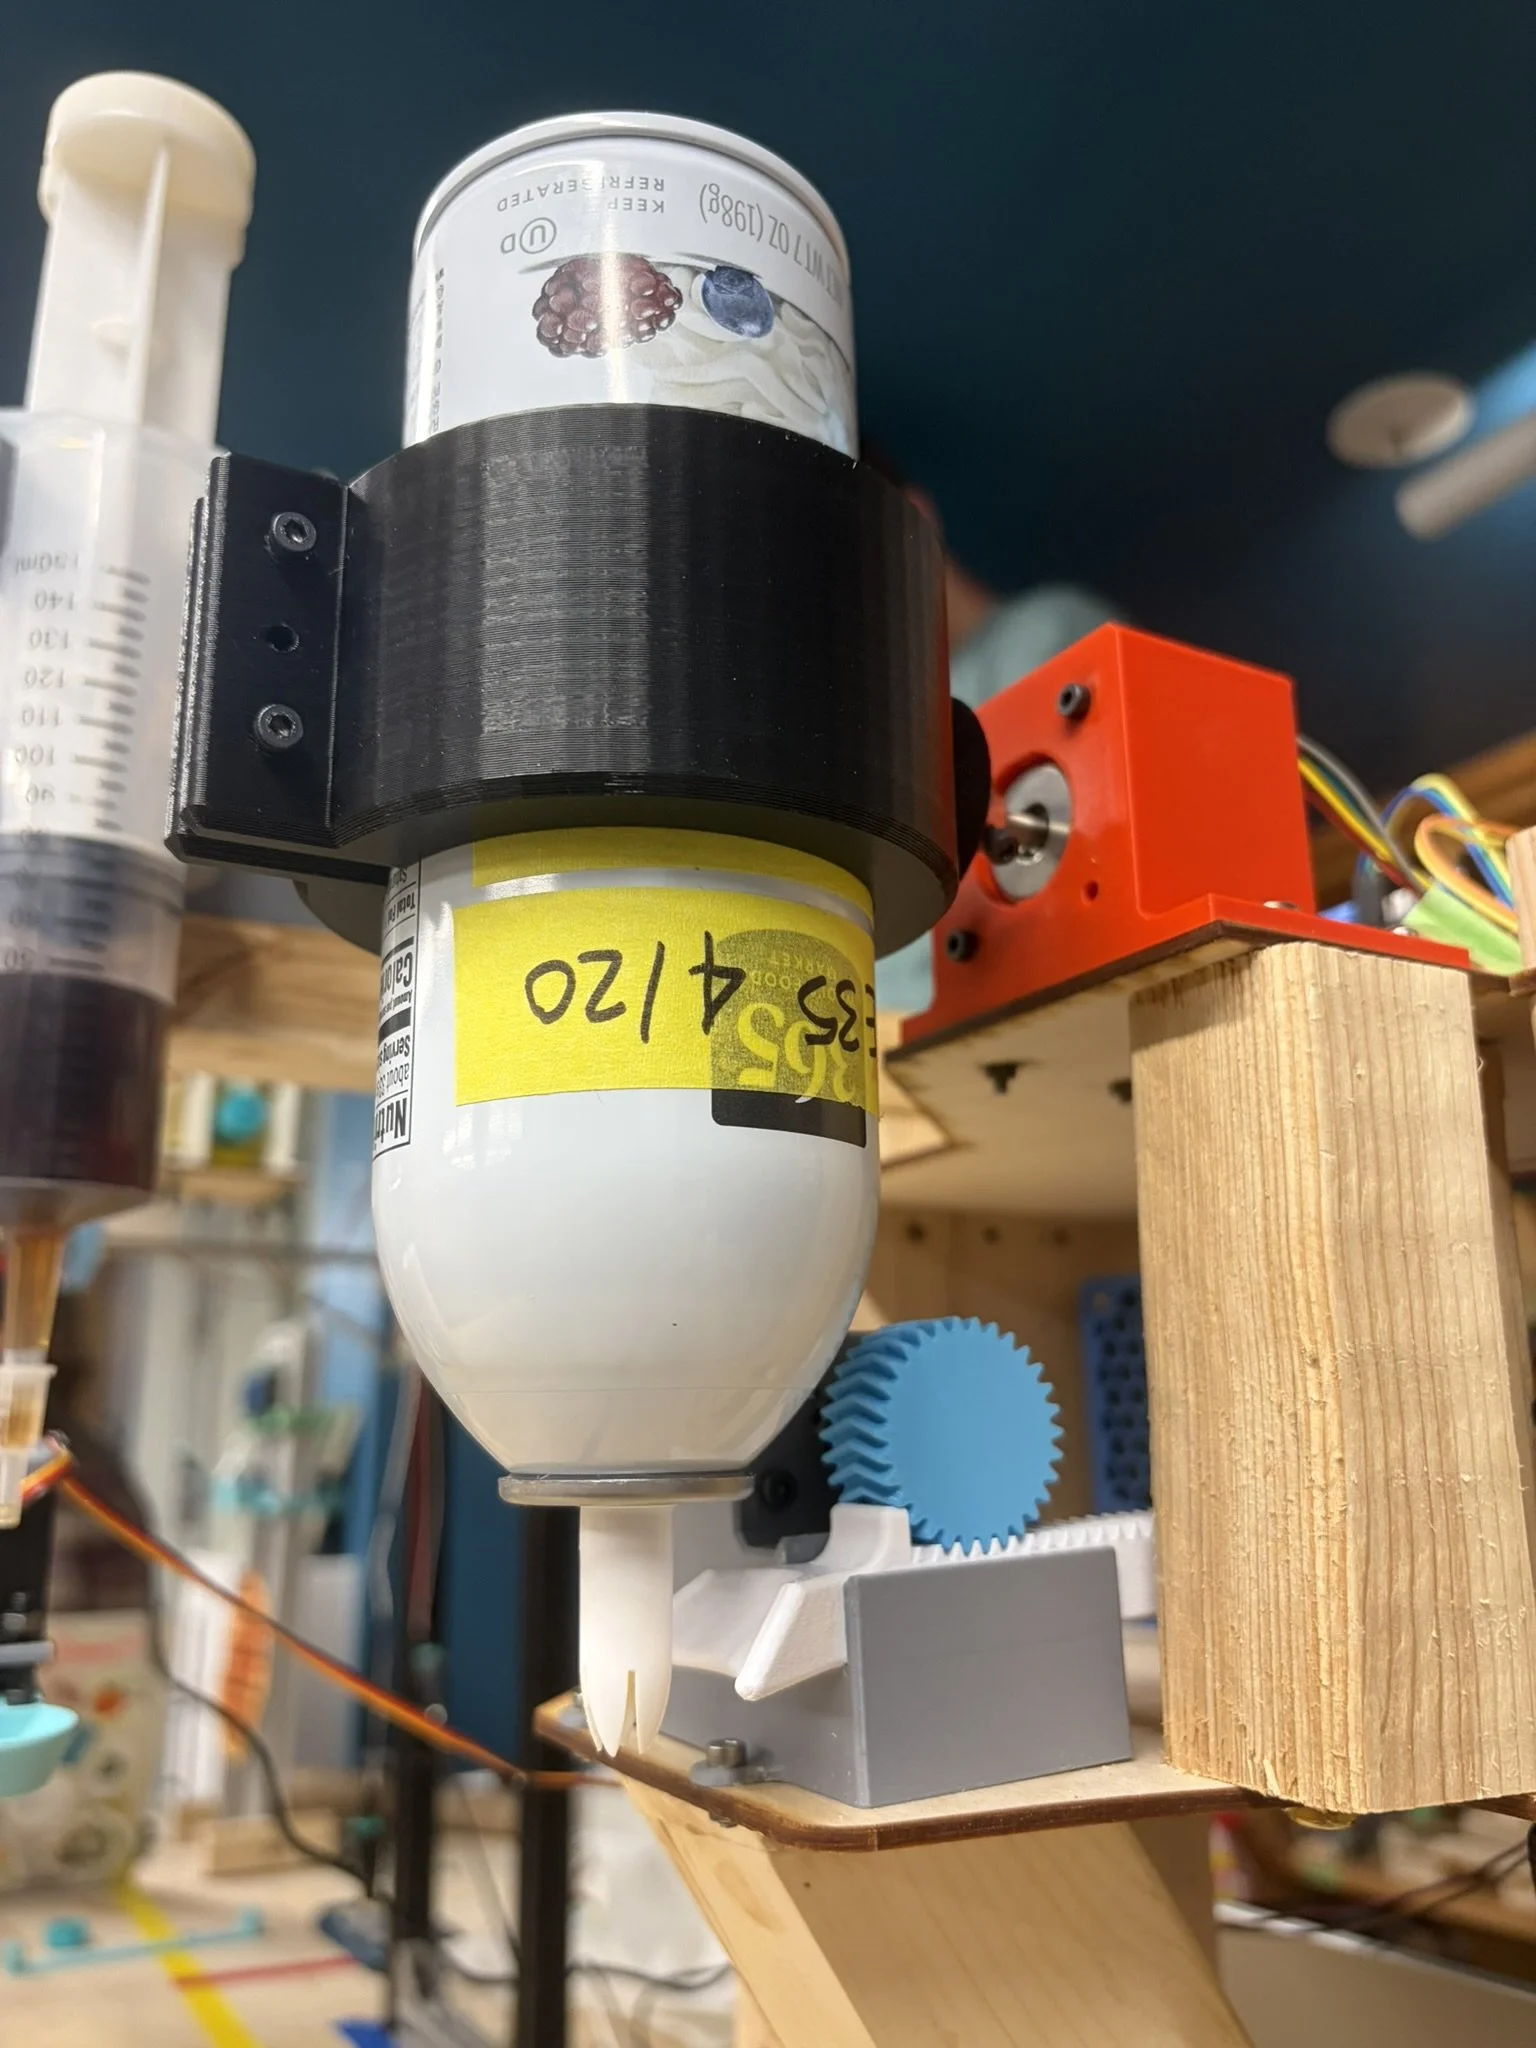
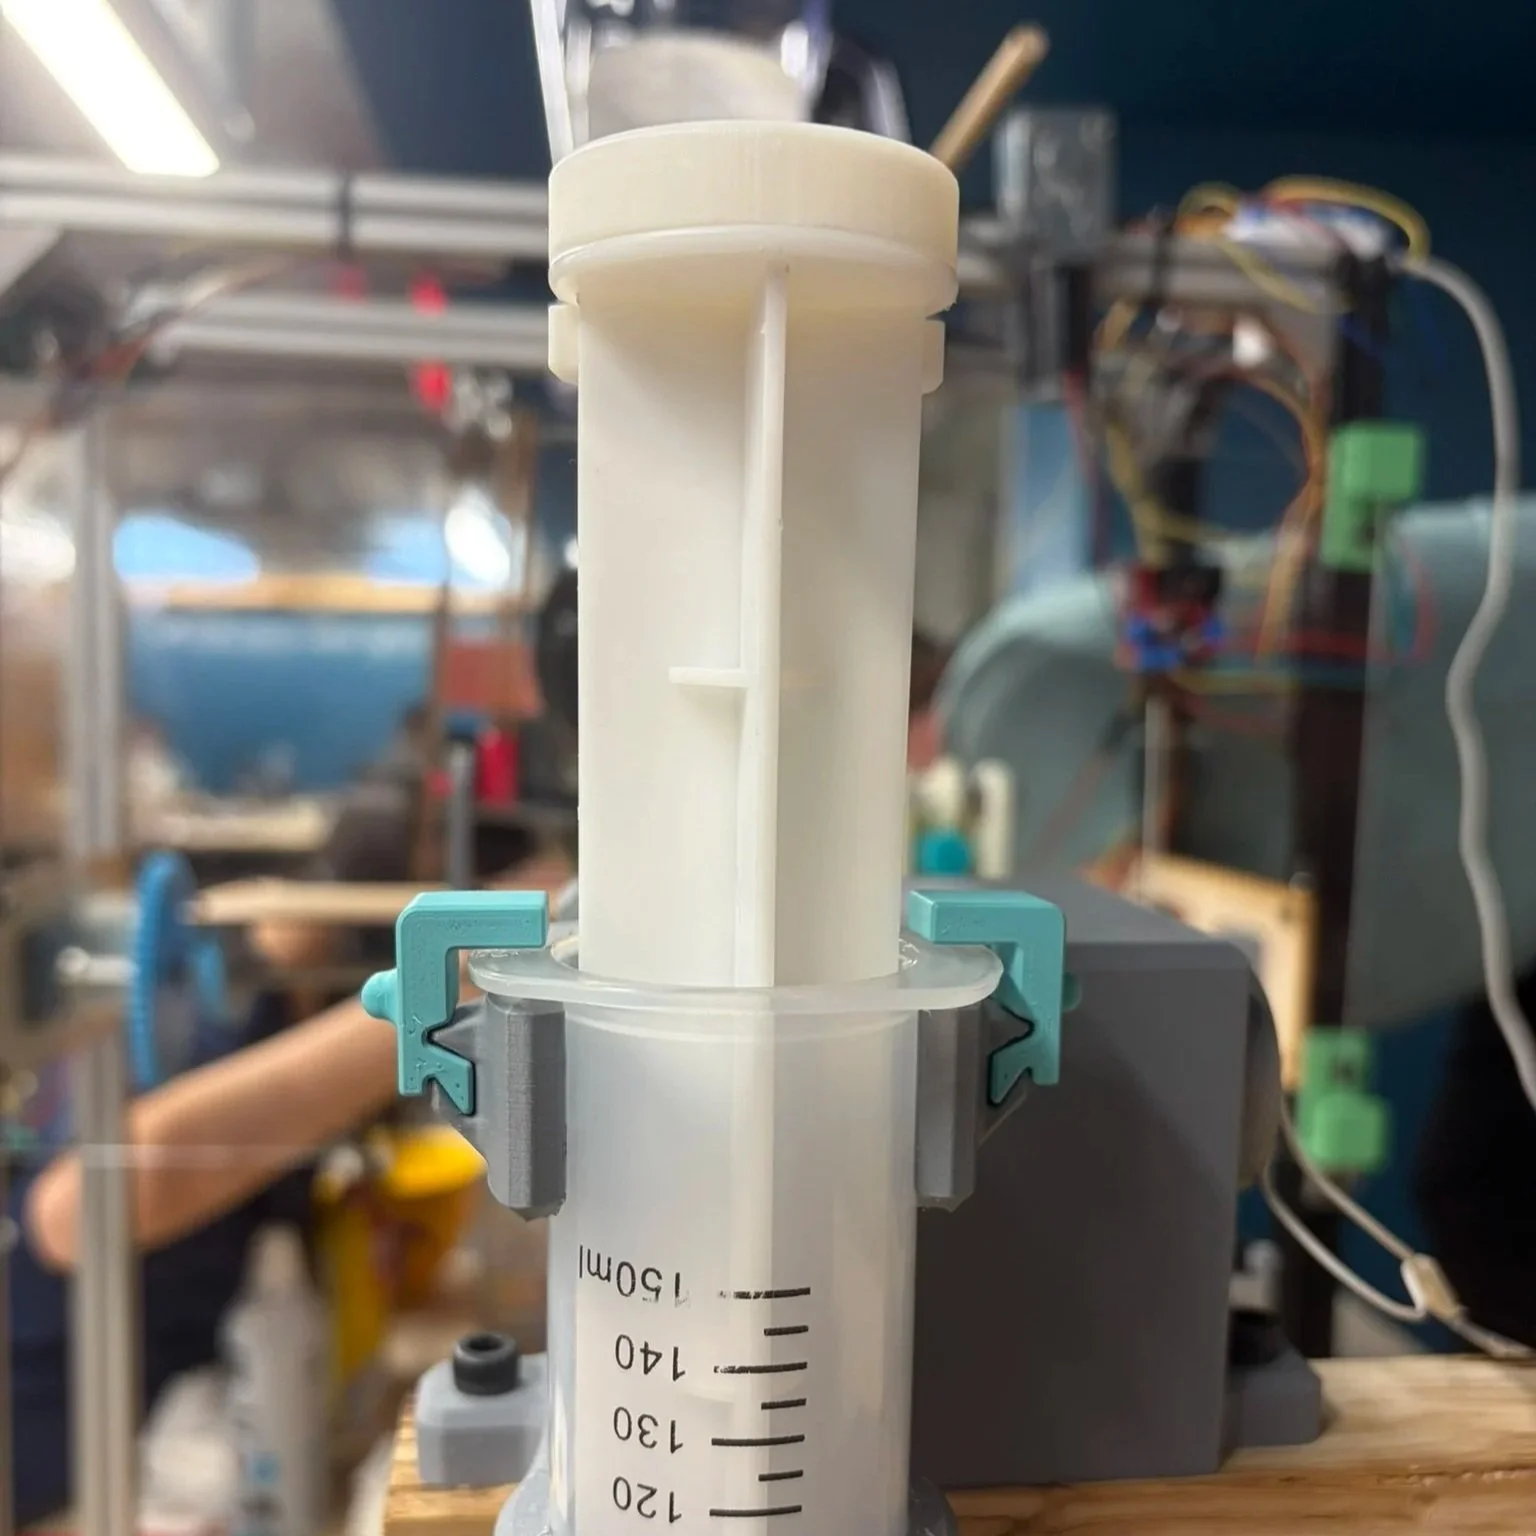
Whipped cream
Worked in group of 5 designing a system to dispense whipped cream onto the waffle
A motor spins the can to aerate it before dispensing
A rack and pinion drives a Y-shaped rack into the nozzle, pushing it sideways to trigger the spray
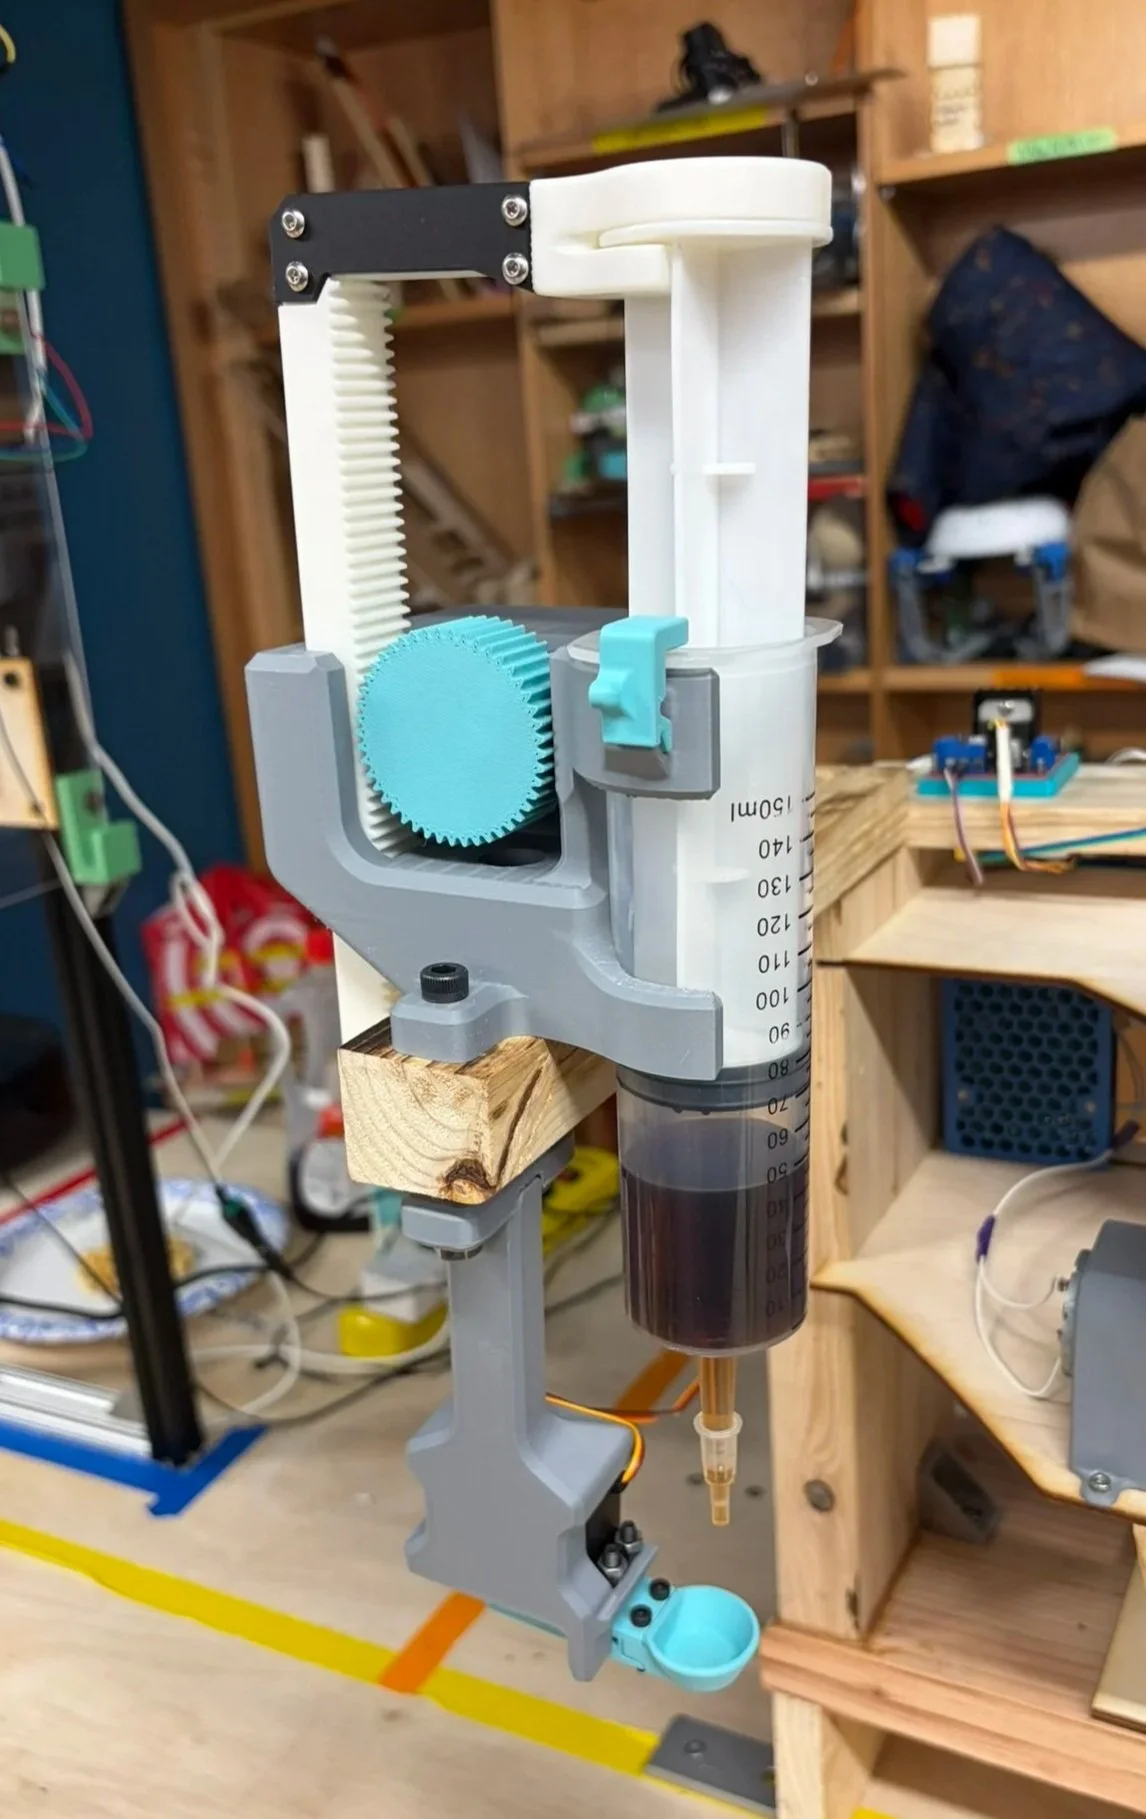
Maple syrup
Worked independently to design and fabricate system
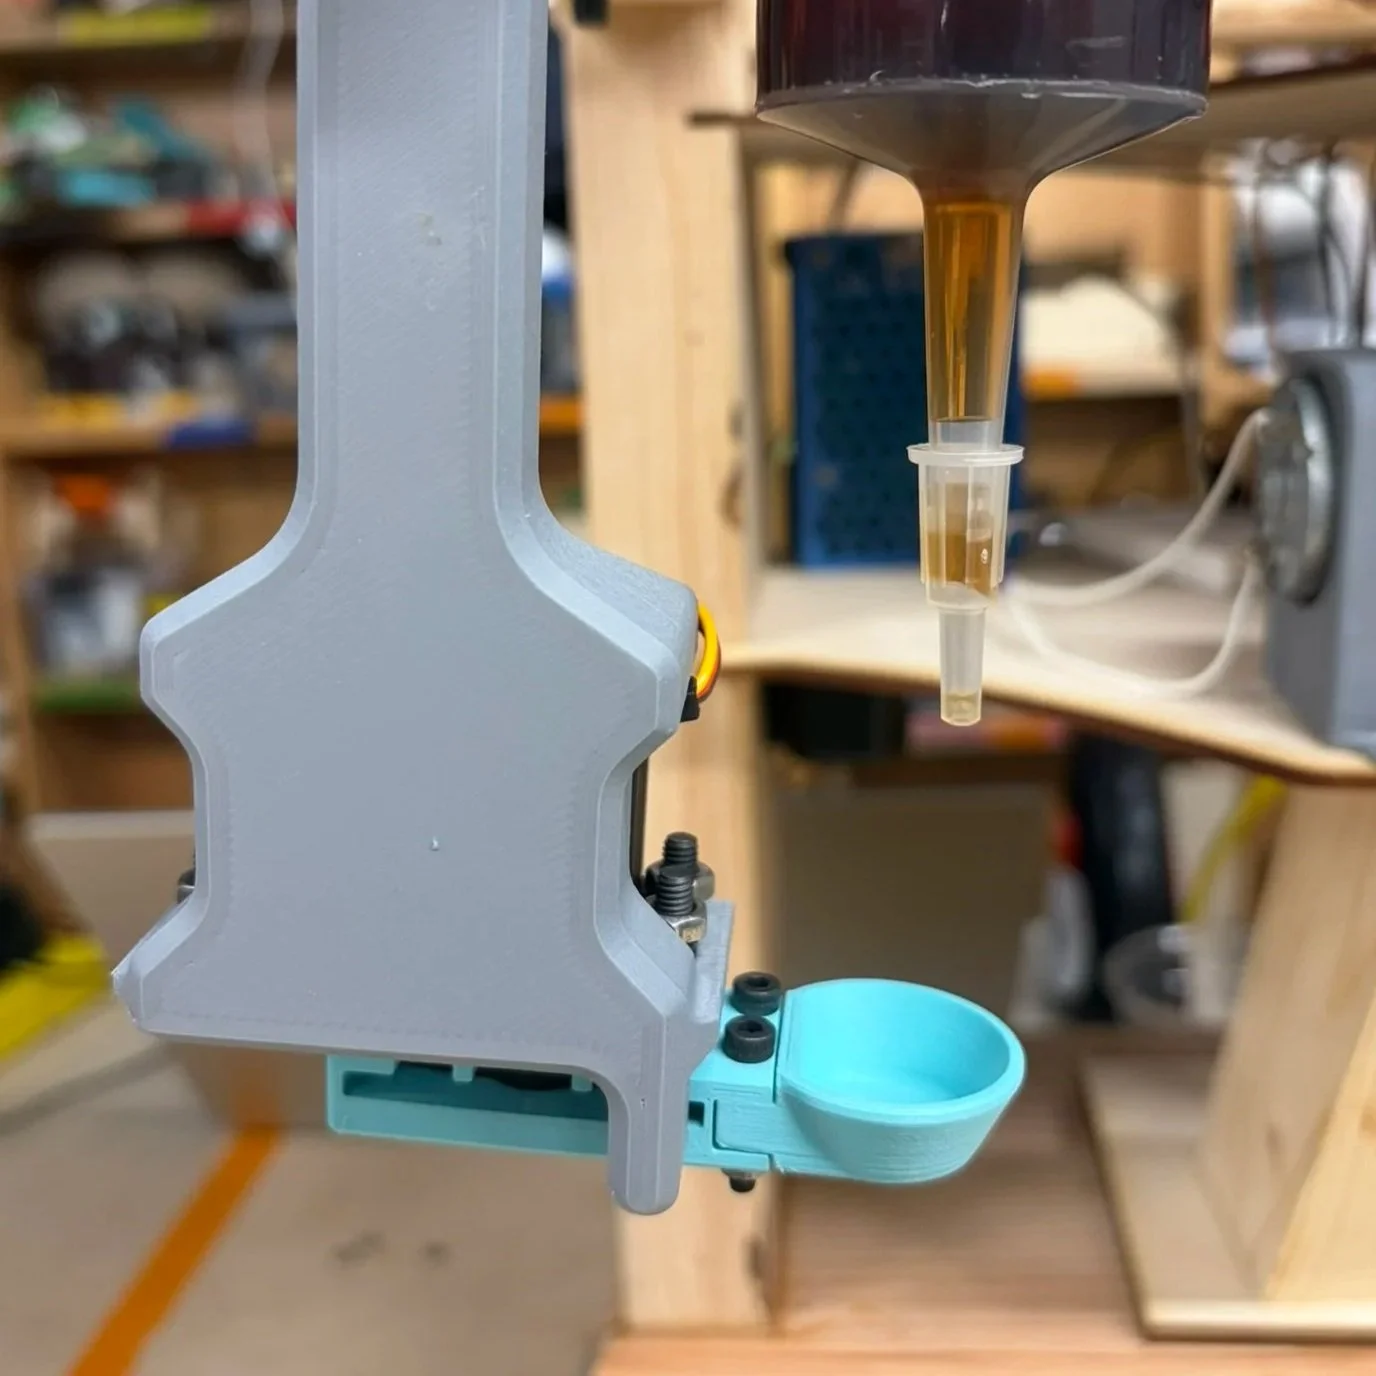
A syringe filled with syrup gives precise control over how much is dispensed
A rack and pinion pushes the plunger down for a set duration, then pulls back slightly to create a vacuum and stop dripping
A motor-driven drip catcher swings out of the way during the pour, then swings back to catch any residual drops
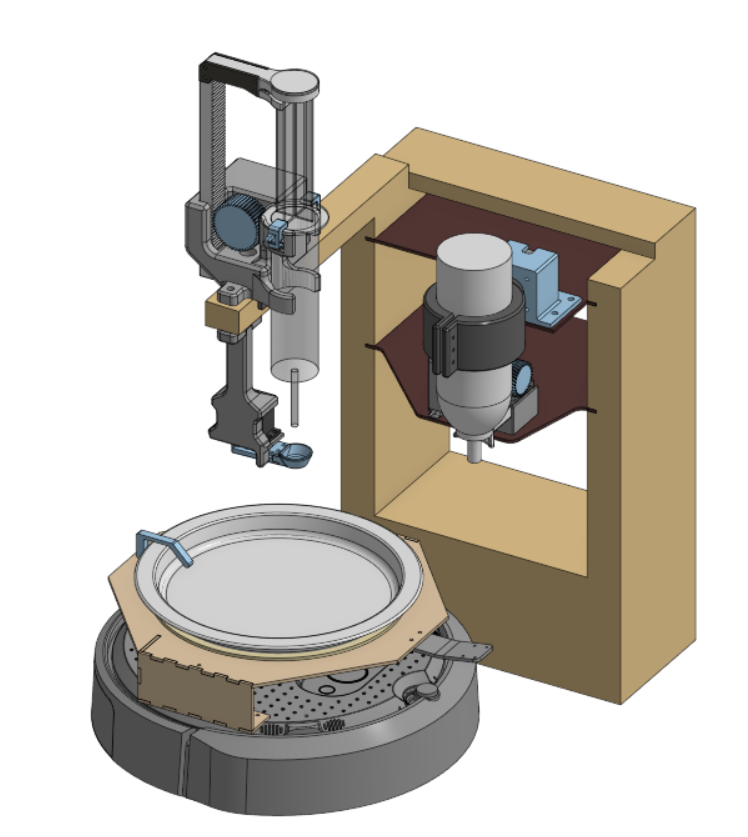
Prototyping and Understanding Components
Prototype Design Process:
Whipped cream:
Motor casing with integrated rack-slide sleeve and Y-channel to intercept the nozzle, with physical stops to keep the rack captive
Collar around can, near-exact fit, screw-tightening clamp, captive nuts at high-load points to allow for repeated use
Syrup:
Motor casing with integrated rack-slide sleeve, snap-fit syringe holder, and removable dovetailed stops to prevent lift on plunger pullback
Designed with frequent syringe swaps in mind
L-shaped rack reinforced with acrylic plates screwed at the bend to prevent shearing along layer lines, and designed to securely snap onto the syringe plunger
Drip catcher with removable cup for easy cleaning, mounted to the servo horn via captive nuts
Servo shares M6 screws with the syrup casing, and built-in stops constrain travel to 90°
Other
Full interactive CAD assembly to simulate motion and catch collisions pre-fabrication
Slotted wooden stand for modular platform swaps during testing (wooden blocks added later to limit flex)
Understanding the Electrical Components Used:
Two Raspberry Pi 4s (one per station) integrated with Airtable to receive and trigger commands within the larger waffle-making pipeline
Airtable is used as a shared cloud state table, with each Raspberry Pi polling and updating its station status to coordinate the order
Whipped cream: 100 RPM DC motor drives the Y-rack, and a stepper motor rotates the can for precise nozzle positioning at the end of the shaking cycle
Syrup: 50 RPM DC motor (higher torque for pushing viscous syrup through a 1.5mm nozzle) drives the plunger, and a small servo handles the drip catcher, where repeatability and position tracking mattered more than power
Code and Programming
How the code works:
Whipped cream:
Waits for Airtable to say "ready" before doing anything
Runs the stepper motor to shake the can back and forth 3 times to aerate the whipped cream
Runs the DC motor backward then forward to push the Y-rack into the nozzle and spray
Reports "success" back to Airtable and waits for the next cycle
Syrup:
Waits for Airtable to say "ready" before doing anything
Moves the servo to swing the drip catcher out of the way
Runs the DC motor forward to push the syringe plunger down and dispense syrup
Pulls the plunger back slightly to reduce the velocity of the syrup so that it stops dripping
Moves the servo to swing the drip catcher back into position
Reports "success" back to Airtable and waits for the next cycle


Click to see code
Both stations ran successfully by the 4-week deadline and performed well in the final fully integrated demonstration
Integration testing began two weeks out, with buffer time built in, anticipating issues, making for a smooth integration process
Whipped cream shaking mechanism left room for improvement, a gear train trading torque for speed, a scotch yoke for smoother continuous linear motion, or both, could have aerated the can more effectively
Syrup ran smoothly, but one possible improvement with more time would have been to add a camera paired with a rack-and-pinion traversal system, which could have detected the waffle's position and adjusted the dispenser to reliably hit the center of the waffle every time
Working across multiple subteams toward a shared goal gave real insight into how different mechanisms interact and the importance of designing with integration in mind, and gave an example of the real-world subteam interactions in various robotic and engineering companies
Final Design and Demonstration
Video of full topping station
Reflection and Takeaways
Great opportunity to learn what it was like to work in a subteam, required consistent collaboration, with setting up cross-team meetings, communicating progress, and offering input to other groups when relevant
Setting early deadlines was probably the best thing we did as a class, as integration went so smoothly that our professor noted it was one of the best she'd seen across all the classes she's taught
It was a great chance to balance my own ambitions of building something more complex with the reality of working in a team, making sure everyone felt heard while still getting a solid final product out the door
This project really cemented how much I love robotics. The debugging and troubleshooting of physical systems with electrical and programmed components continues to feel incredibly rewarding, and it's only made me more excited about the field