Identifying and Delivering Robot
Quick Summary:
One-week project to extend a Create3 robot with the ability to identify, lift, carry, and drop objects at designated points
Worked in a group of three, held a major role in mechanical prototyping, electrical troubleshooting, and writing code for driving and arm operation
Challenged ourselves by designing a full robot arm that moved the gripper out of the camera's line of sight
One of the most rewarding projects I've worked on, pushing through complex troubleshooting, iterative redesigns, and learning how the machine learning pipeline worked end to end
Project Contraints
Project Constraints
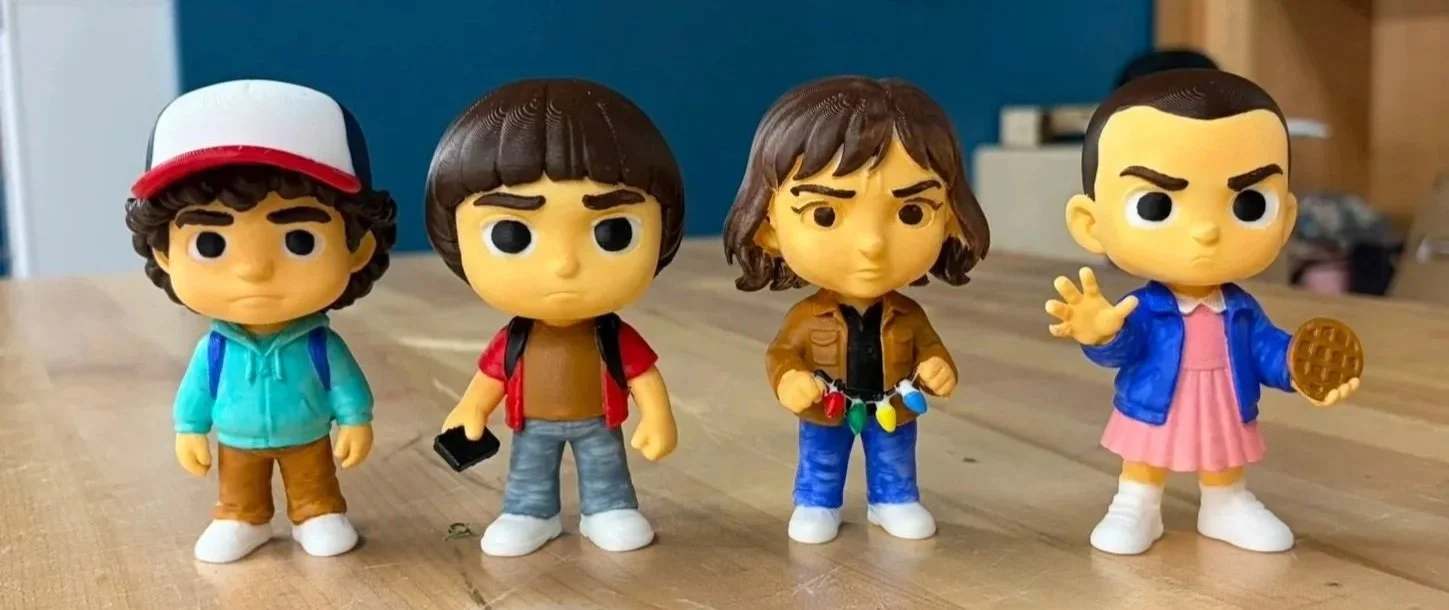
The robot must identify at least two figurines using a machine learning model trained with Teachable Machine
Character to drop-off location mapping is revealed only 10 minutes before the demo, requiring quick configuration and testing
The orientation of the figurines is unknown beforehand, so the vision system must detect characters from varying angles
The robot must navigate to a predefined pickup location, detect the character, and transport it to the correct drop-off location
After starting the program, the system must operate fully autonomously with no human intervention
One week's time constraint
Self-Imposed Constraint:
Build a robot arm with a built-in grabbing mechanism to lift and drop the figures
Understanding the Task
Two characters must be selected from a set of four available figurines
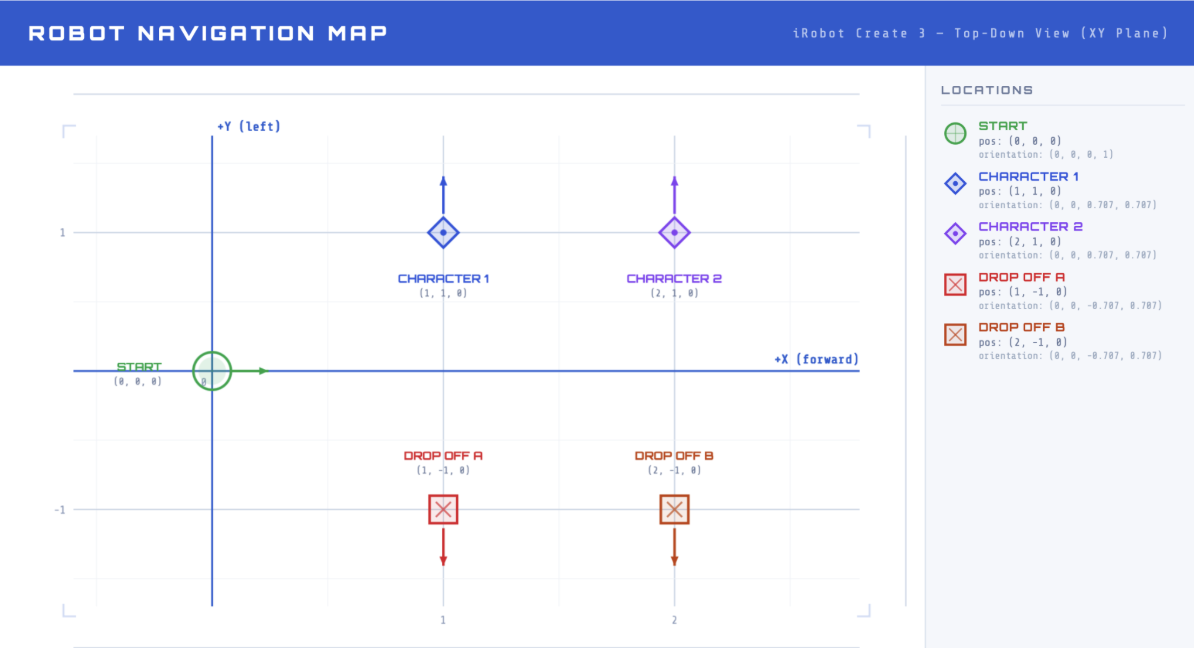
Figurines are placed 1 meter apart in the workspace
The workspace uses a grid system:
Robot start position: (0, 0)
Figure 1 location: (1, 1)
Figure 2 location: (2, 1)
Drop-off 1 location: (1, -1)
Drop-off 2 location: (1, -2)
Character-to-drop-off mapping is revealed 10 minutes before the demo, requiring rapid setup
The robot must navigate to the correct character location, pick up the figurine, and autonomously identify the character using machine learning
The robot must deliver the character to the correct drop-off point without any human intervention
Prototyping and Understanding Components
Prototype Design Process:
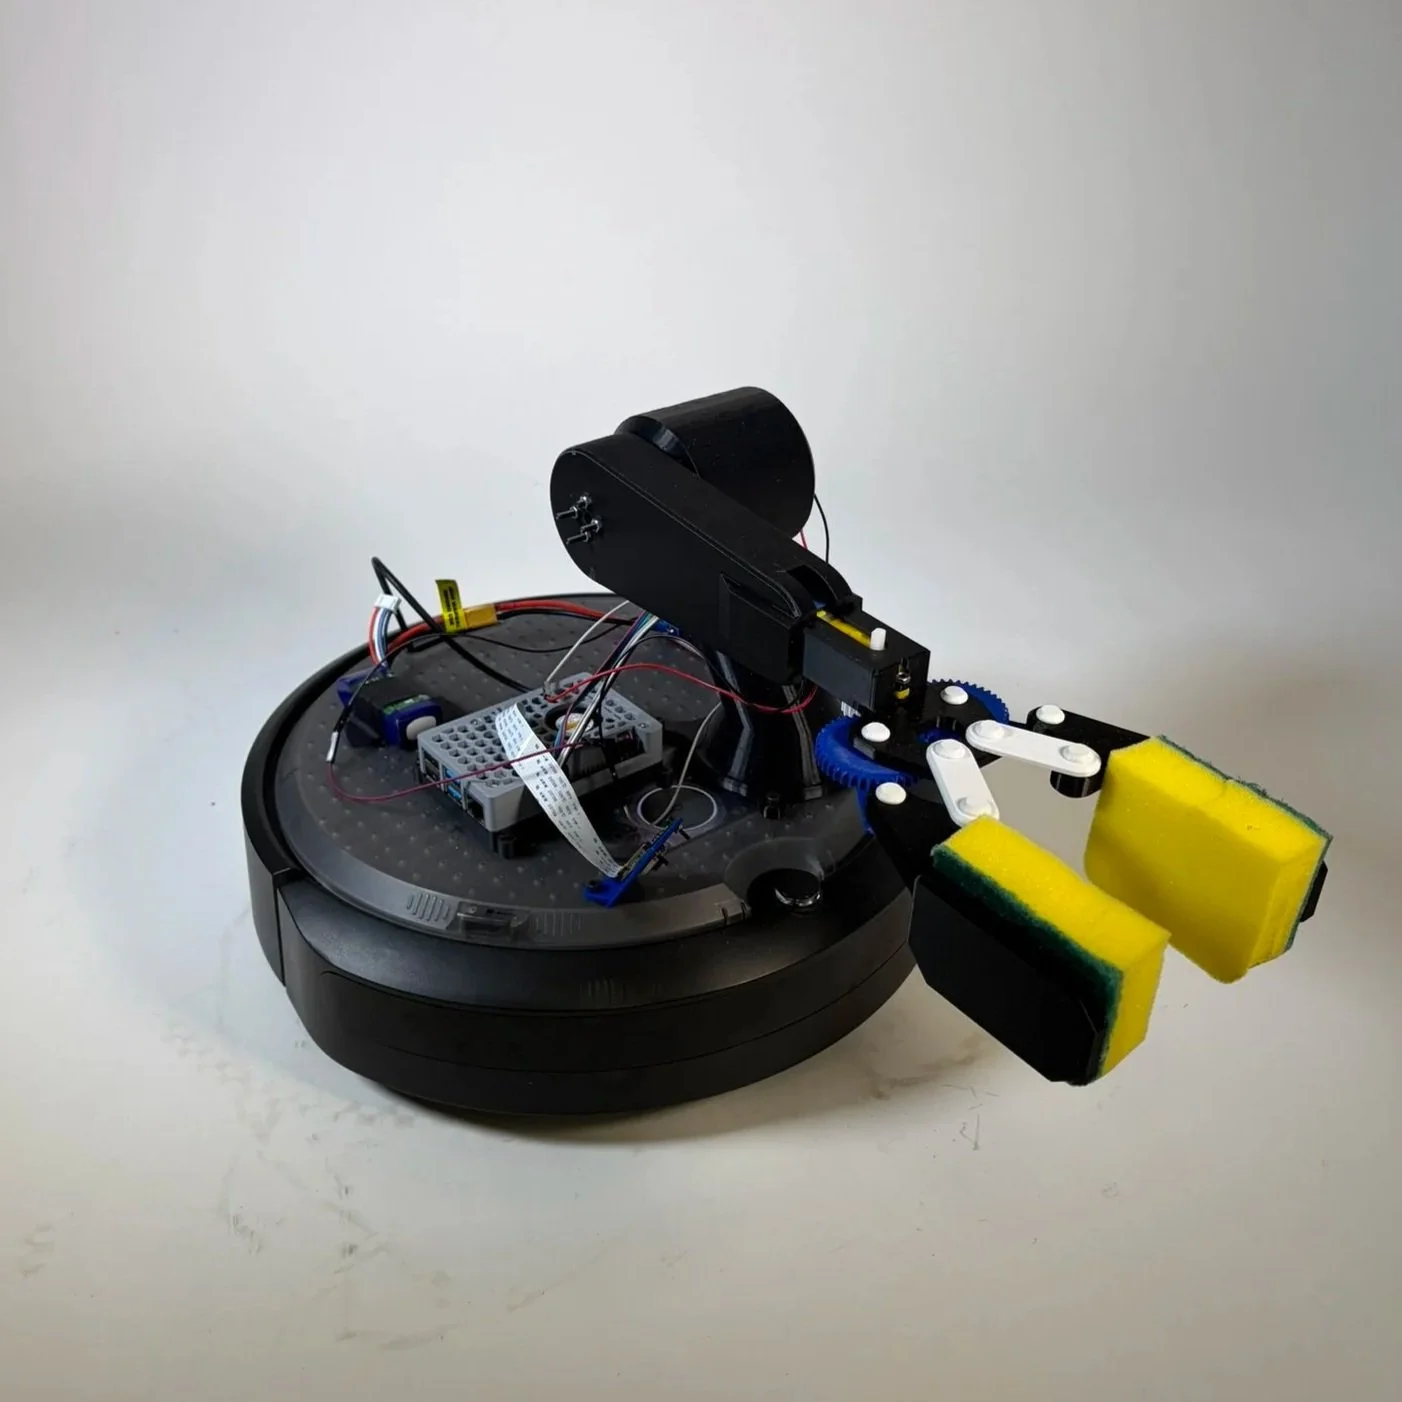
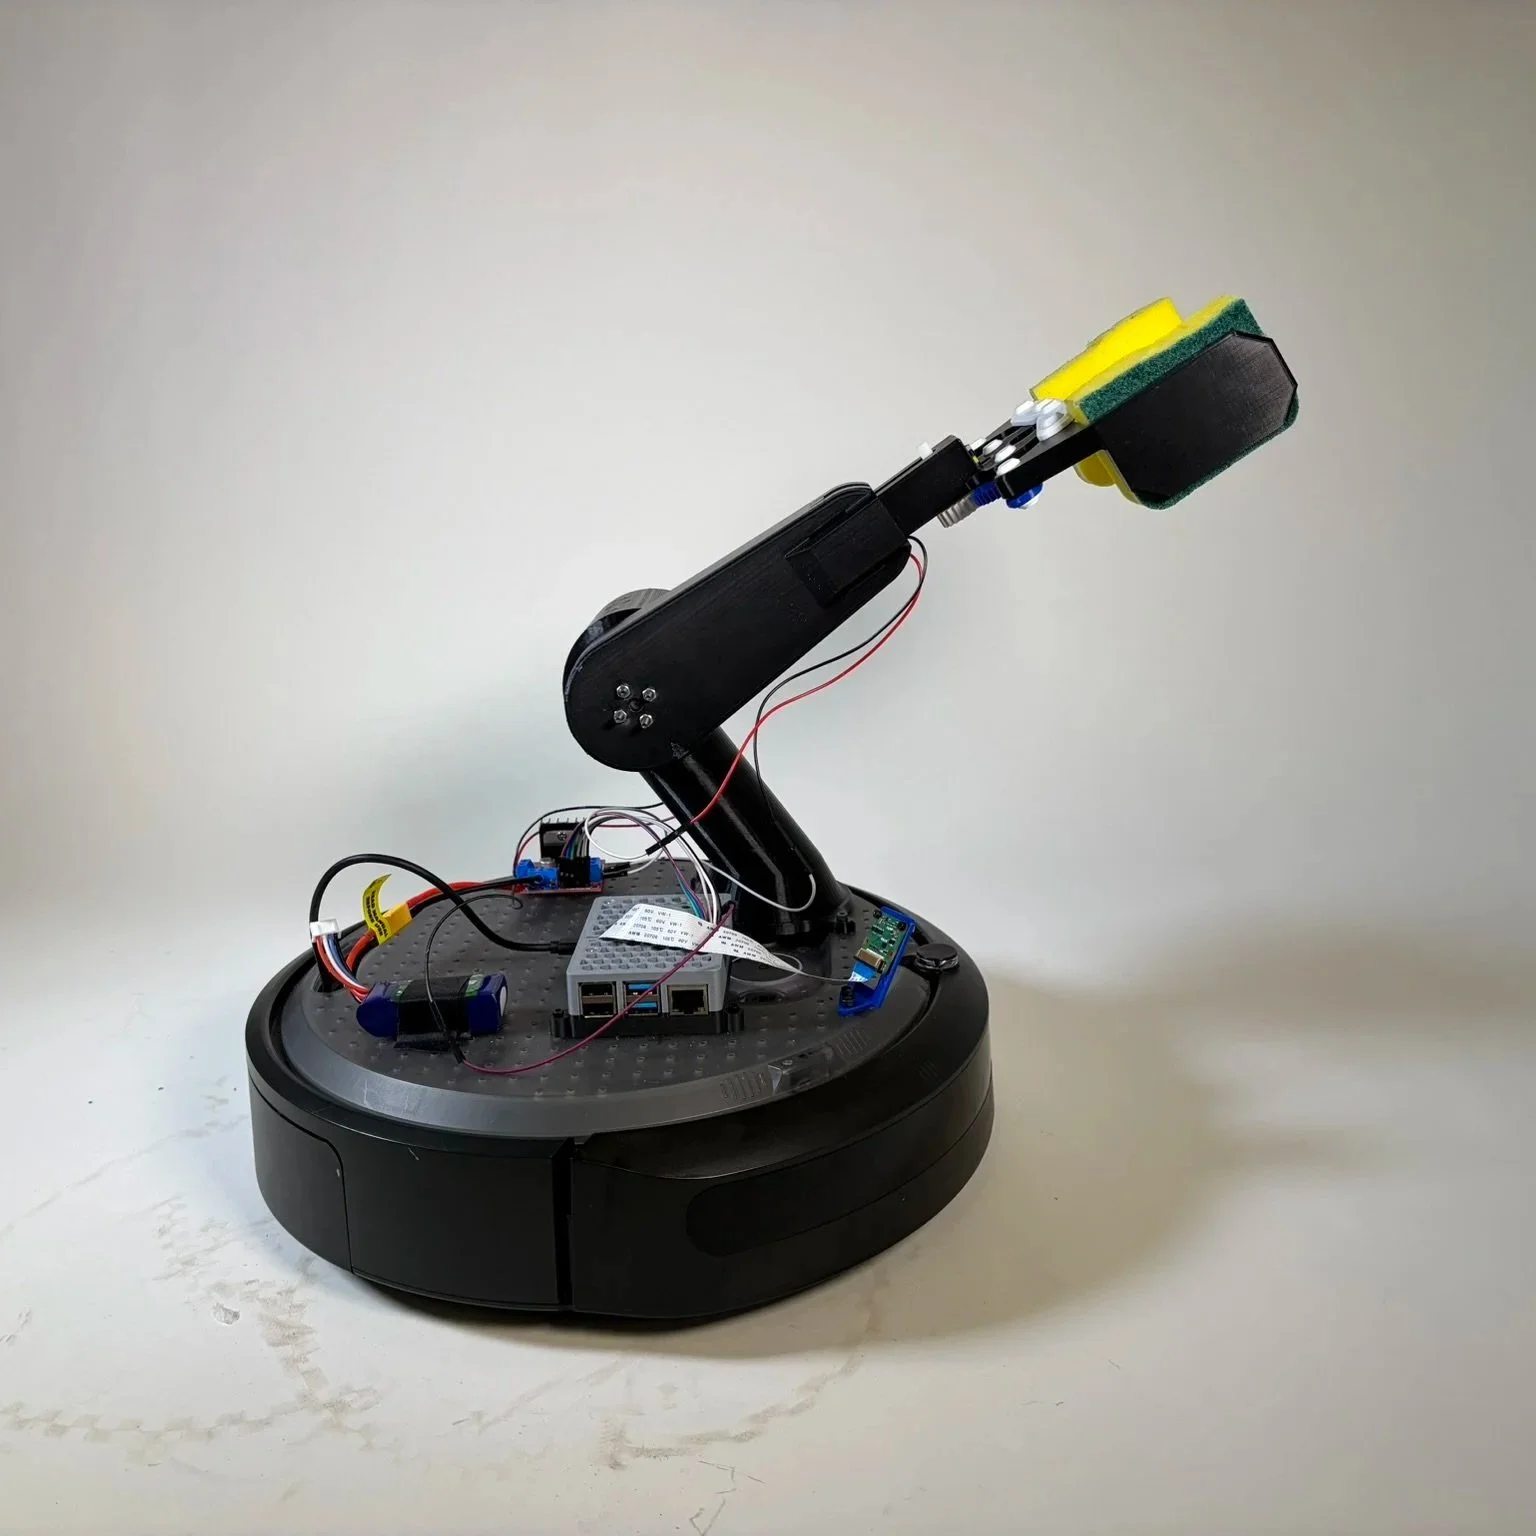
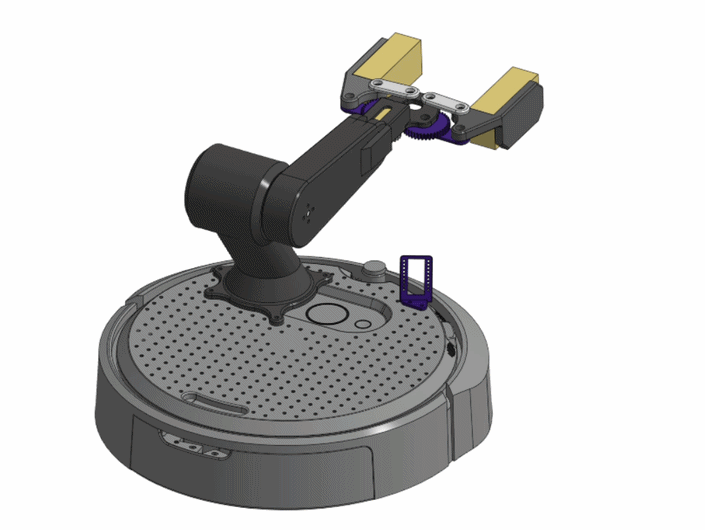
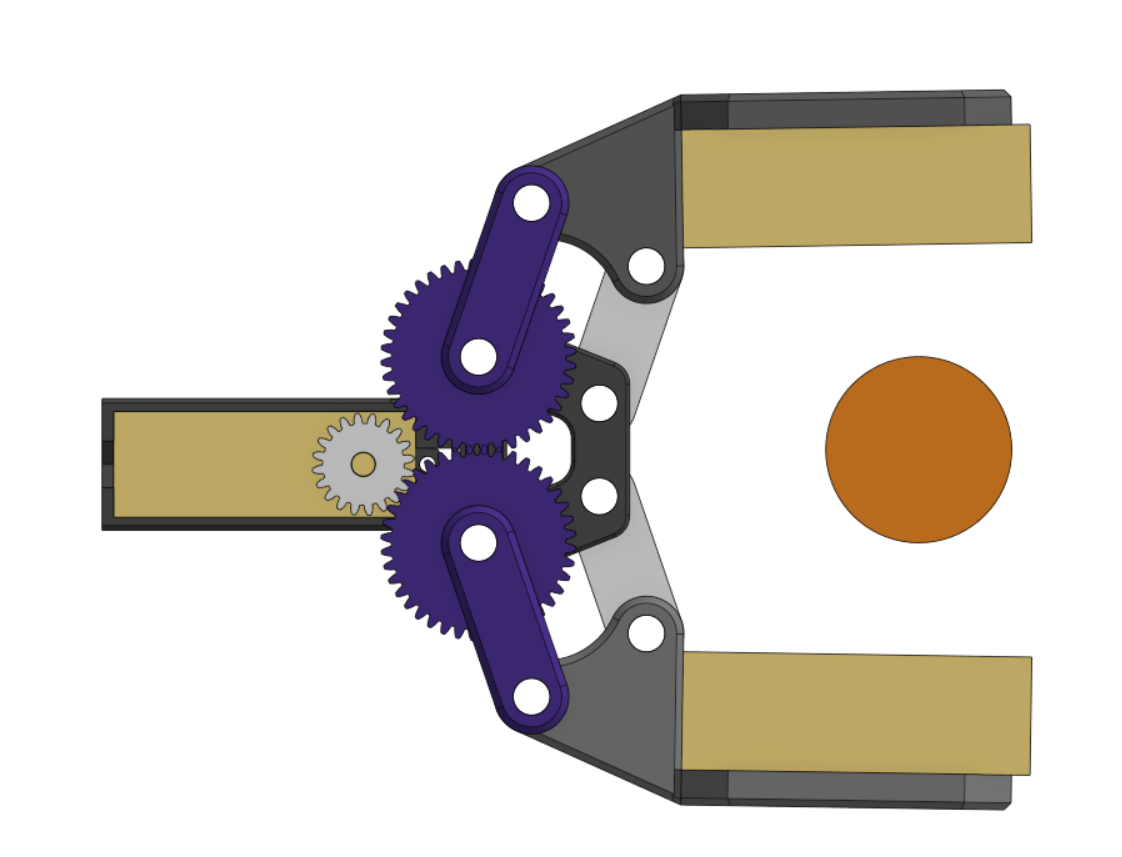
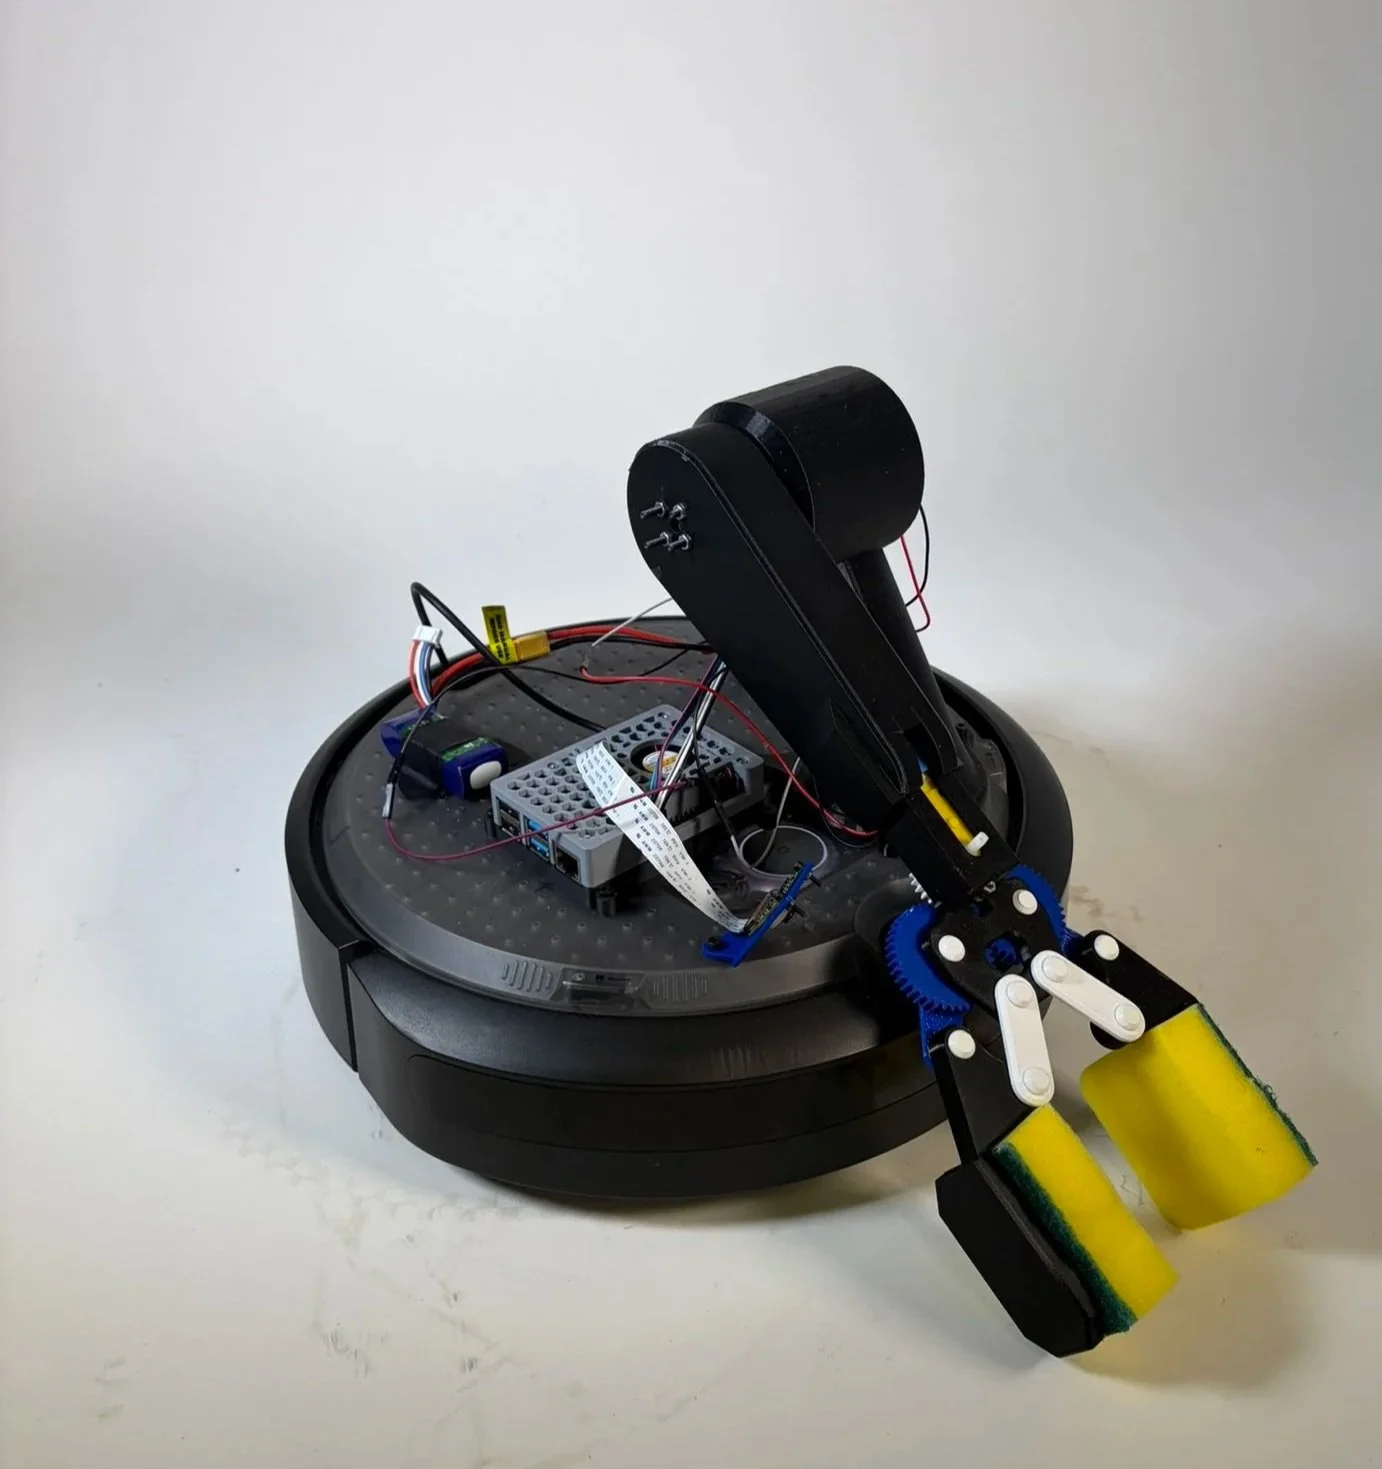
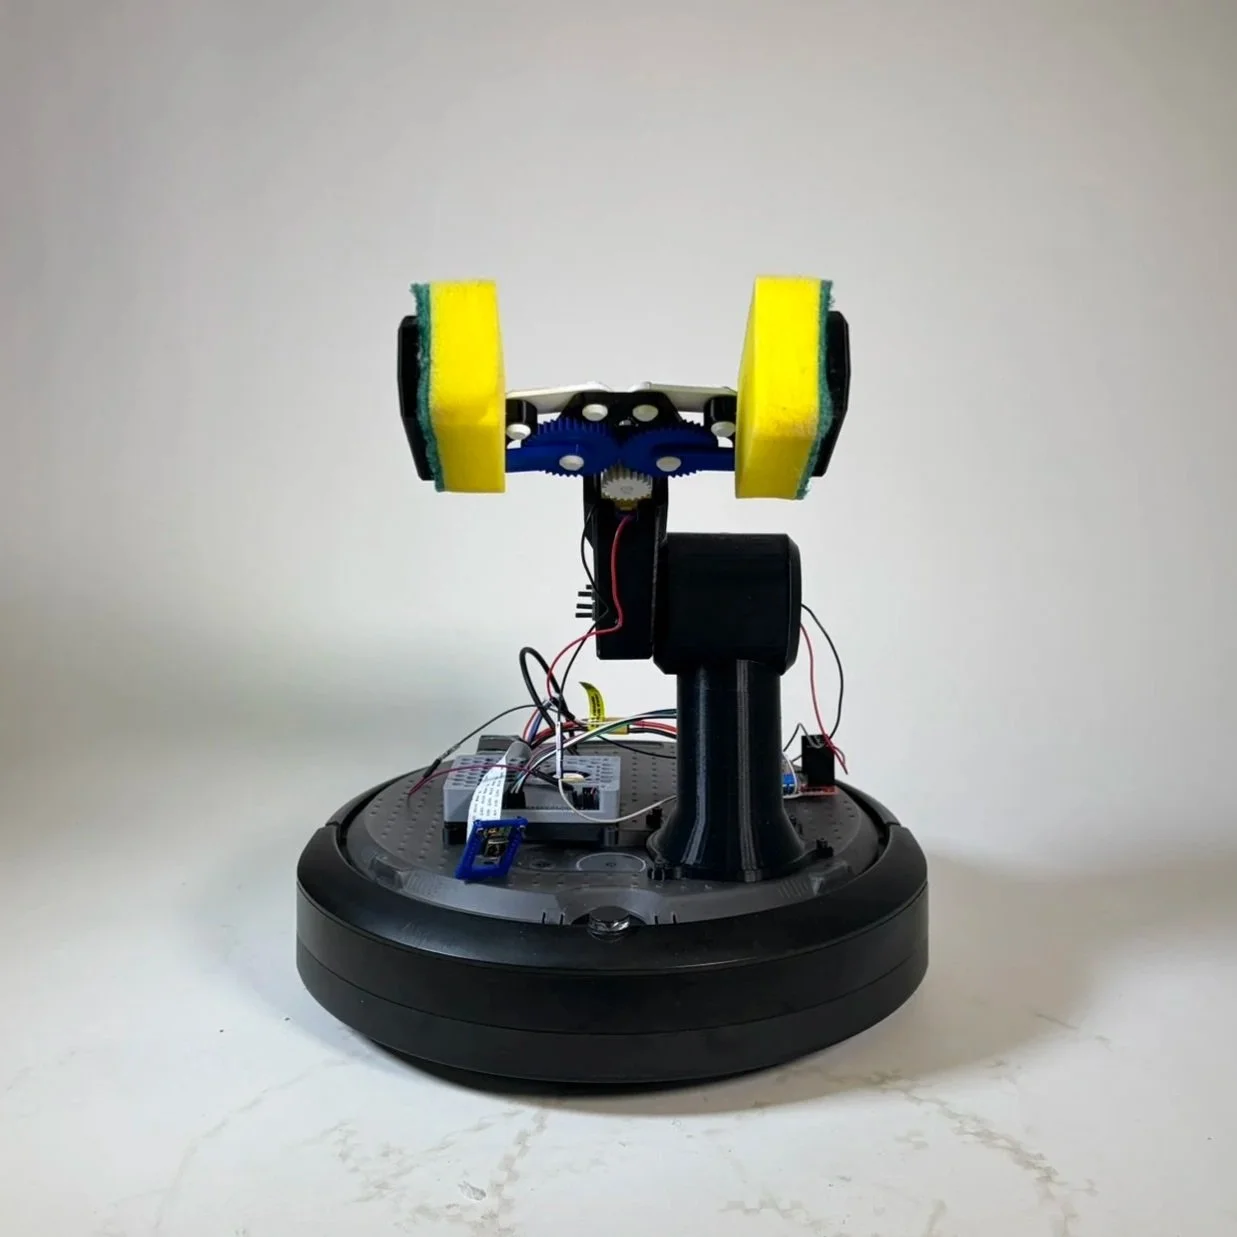
We 3D-printed a custom single-pivot arm with a 4-bar linkage claw to grab and lift the figures
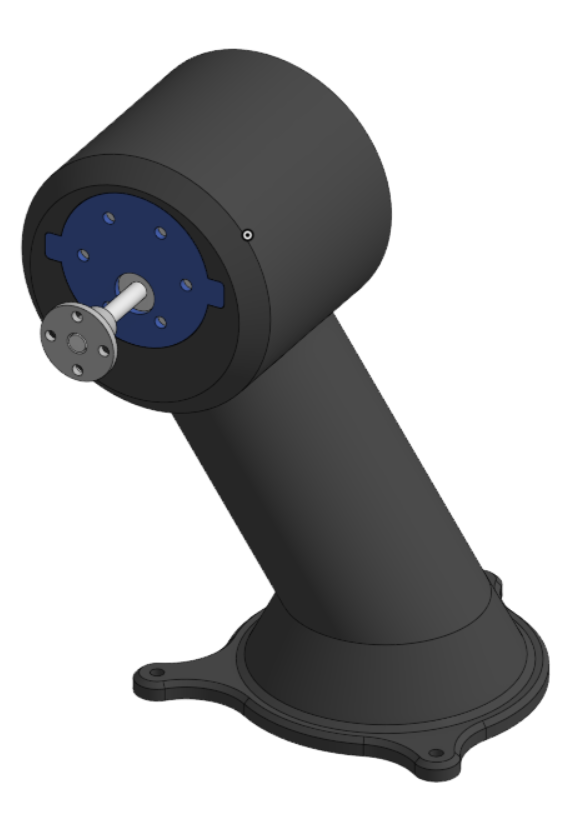
A 50 RPM DC motor with a flanged motor coupling lifts and lowers the arm, while a smaller DC motor actuates the gripper
The upper arm was designed to be completely hollow, reducing weight so the motor could lift the arm and gripper efficiently, verified with moment calculations
Soft sponges were added to the claw tips to conform to the figures, increasing grip and reducing the chance of slippage
The arm system can move the claw from the ground up, allowing figures to start on the floor without needing a raised base
Understanding the Electrical Components Used:
The system used a Raspberry Pi 4 as the main computer, connected to the iRobot Create 3, which works with ROS2 and provides access to internal values such as odometry readings
The iRobot Create 3 is a programmable mobile robot with built-in motors, sensors, and ROS2 support, allowing autonomous navigation and docking
Two DC motors were powered by a motor driver and a LiPo battery
Raspberry Pi Camera Module 3 used for vision,
12 MP resolution, autofocus, and up to 50 fps capture, supporting reliable real-time vision for character identification
Code and Programming
How the code works:
The robot uses a Raspberry Pi 4 connected to the iRobot Create 3 with ROS2 for navigation
It drives to pickup points, turns, and moves precisely using odometry from the robot’s sensors
Two DC motors control the arm and claw. Functions like arm_up(), arm_down(), open_claw(), and close_claw() move the arm and gripper using timed PWM signals
The robot picks up a figurine by lowering the arm, closing the claw, lifting the arm, and then navigating to the correct drop-off
All movements and actions are fully autonomous, with no human intervention after starting the program
How the machine learning in the system works:
A Raspberry Pi Camera Module 3 captures images of the figurines in real-time
Images are preprocessed and sent to a Keras model trained with Google Teachable Machine
The model predicts which character is being held, and the code uses a voting system across multiple frames to improve accuracy
The robot then maps the detected character to the correct drop-off location
Teachable Machine workflow:
We took multiple photos of each character
Trained the model in Teachable Machine
Exported the model (keras_model.h5) and labels (labels.txt)
Ran it on the Pi for real-time recognition
Click to read the code
Our robot successfully identified the two characters we selected, was able to lift both, and placed them into the correct boxes after identification
We encountered challenges with distances, as the robot would often stop slightly short or overshoot its target. By implementing consistent position checks against the dock and using the Create 3’s built-in odometry, we were able to reliably reach the expected locations
The robot arm proved more challenging than anticipated. Through trial and error, refining lift and lower times, and adjusting PWM settings, we were able to get the DC motor to lift the arm reliably. Ideally, we would have used a stepper motor, but the one available was not strong enough and would likely have required at least a 6:1 gear reduction to succeed
Occasionally, the robot had trouble identifying one of the characters. With more images and an additional round of training, we are confident it could identify the figures more reliably
Final Design and Demonstration
Video of a successful run
Reflection and Takeaways
I learned a lot more about ROS2 and how to code and design around existing products, taking advantage of built-in features and affordances
The main takeaway was resilience in troubleshooting and sticking with the integration process
We made a conscious effort to continuously test parts together in context, which let us integrate faster than if we had built and tested each part individually
This approach also helped us problem-solve quickly when issues inevitably arose
Integrating code with a complex, moving system was challenging, but with time and effort, we were able to get the robot arm to perform reliably
This was by far the most satisfying robot I’ve built. Even though the arm was very difficult to construct, I’m really proud of how it turned out and how well it works